Since Biologisk dynamisk forening announced a course on making unpasteurised cheese not far from where I live, I naturually joined up. The course was being run by Markus Koot who had learnt cheesemaking from his father.
Before we arrived, Markus poured soured milk amounting to 1.5% of the total volume, into a cheese vat containing 120 litres raw cow’s milk at 29°C. He told us that adding soured milk has two purposes:
– prevent growth of unwanted bacteria.
– add important enzymes, which contribute to maturing the cheese and developing taste.
After a delicious lunch, we entered the dairy where he told us what he had done and that he would next pour rennet into the milk, amounting to 25 ml per 100 litres milk, in order to start coagulating or curdling.
Thereafter, he heated the milk to about 38°C, which is required to promote growth of the wanted bacteria, by means of hot water in the walls of the cheese vat. Next, we should wait for the milk to coagulate and form a gel, which would take about 45 minutes.
During the waiting time, we went to the barn which was located next to the dairy. About 5-6 cows were inside the barn, eating hay, while one tiny calf was standing alone. However, after a short time, its mother entered the barn and started staying with her offspring. The cows at this farm are a mixture of several more or less rare races among others Jarlsberg cattle in Norway and Markus told us that the cows are good mothers, they take care of their offspring, they bear calves on their own and they can stay outside all winter having fur to protect them against the cold. The calves stay with their mothers for 6 weeks, then they are separated but allowed to see each other. After 6 more weeks, the calf is brought to a shed where it stays with other calves until it’s sexually mature.
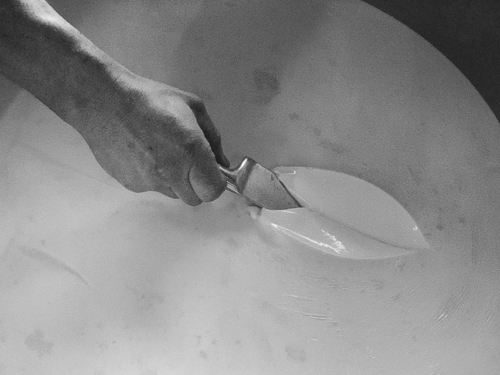
After our visit to the cows, we paid a visit to the hen house where about 250 hens were laying about 150 eggs per day. Next, we went back to the dairy and looked into the cheese vat. The milk had turned into a gel, that is it had curdled. Markus cut it with a knife, next he lowered it below the cut and turned it around such that it was parallel with the surface and lifted it up gently, making the cut look like an apple from which a spherical wedge had been cut out.
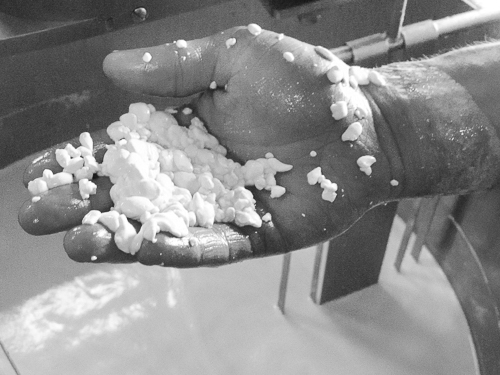
Next, it was time to cut it in 6 equally sized parts from top to bottom by means of a knife. Therafter, he assembled two metal devices called harps above the cheese vat and lowered them into the milk. Having started a machine, the harps started rotating, stirring the milk continually. After some time, he stopped the harps momentarily in order to check the state of the curds, that is the milk proteins (casein) tangle into solid masses. As always in cheesemaking, it’s necessary to separate the curds, which will be turned into cheese, from the whey , which forms the liquid part of the milk. He inspected the curds by lowering hs hand in the warm milk and collecting curds. Next, he brought them to the surface and squeezed them together. In the beginning, they were too soft and he started the harps again, but after some time and more sampling, enough whey had been separated from the curds that we could proceed.
Next, one third of the whey should be released and two thirds of it should be replaced by water in order to make the cheese less sour and more limber. Since he started with 120 litres of milk, he wanted to pour out 40 litres of whey and add about 26 litres of water in order to make gouda cheese. By placing a metal filter inside the vat in front of the release valve and opening it, only whey was let out while the curds had to stay. The whey was let into a couple of containers and it would be given to the calves afterwards.
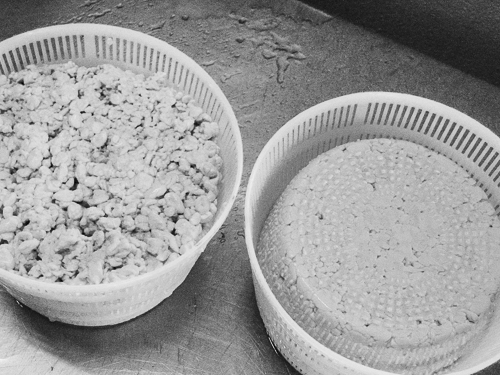
After having stirred the mixture some time, it was time to take out the curds and transfer them to porous plastic baskets. Next, we should compress the curds in order to let out more whey. At the same time, the collection of curds are turned into cheese mass. Later, we should turn the cheese masses upside down and compress them again. Actually, Markus would turn them upside down some times more after we had left since we only stayed from 12 to 4. Thereafter, he would dip them in floating wax in order to protect them against mould.
As shown above, the curds, which have been collected together in plastic baskets look very different from cheese. In fact, they have to be matured or ripened before they are turned into cheese. Next, we entered the storeroom adjacent to the dairy where cheeses were lying on wooden shelves, being stored at a high relative humidity of about 80% and a low temperature. In addition, a cheese was being stored in brine, which is used to harden the crust, adding flavour and conserving the cheese. Mould was growing on some of the cheeses, and since we were attending a course, we were allowed to clean some of them by means of running water and a brush.
Markus told us that the cheeses have to mature for at least 3 months, but he doesn’t sell them before they have ripened for at least 6 months and maximum 1 year. As explained here, cheese ripening is “characterized by a series of complex physical, chemical and microbiological changes” that incorporates the agents of “baceria and enzymes of the milk, lactic culture, rennet, lipases, added moulds or yeasts, and environmental contaminants”.
After the course had finished, we could buy whatever we wanted from the farmshop next to the dairy. There, we could buy products like meat, cheese, eggs, yogurt and raw milk straight from the cows. I almost never drink milk, but if I had to, I would have preferred raw milk because it’s so tasty and it has a fatty consistency. Of course, this requires cows which are in excellent health and total cleanliness in order to avoid dangerous bacteria.
This farm has been run by Markus’ father since 1991 and Markus and his brother took over the farm in 2016. It’s a biodynamic farm and it’s located in a lovely area near the town of Holmestrand. If you call in advance, Markus can set aside products for you or you can buy them at select shops in Oslo like Ekte Vare and Mølleren Sylvia.
Markus arranges cheesemaking courses occasionally as shown on this Facebook page.
As for those who want to make their own cheese, there are many web sites, which offer advice. If you live in Norway, you can buy dairy equipment from Ystebui. Anyway, as one of the participants, who had already been making cheese for some time, said: “Making cheese is easy, but making the same cheese every time is very difficult.”


